2. evolution- email client providing the mail user agent (MUA)
2.1. About evolution
2.1.2. Incoming mail
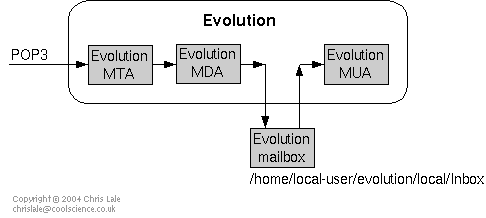
The first step is to configure and test evolution so that it sends mail directly to your provider's server, and receives mail directly from it.
Later, you must change evolution's configuration for incoming mail. This is to allow other software applications to take over some of the processing of mail before it reaches evolution.
2.2. Install evolution
$ su Password: ******* # apt-get install evolution |
Exit from root when the installation is complete.
# exit $ |
2.3. evolution's 'Inbox' folder
Run evolution as a normal user.
$ apt-get install evolution |
Menu bar File Go to Folder ... Go to folder ... dialogue Go to folder ... dialogue Inbox OK |
2.4. Configure evolution to send mail to and retrieve mail from a remote server
Menu bar Tools Mail Settings ... Add Mail settings dialogue Accounts tab Add |
This brings up the evolution Account Assistant's Mail Configuration dialogue .
Mail Configuration dialogue
   Click "Next" to begin
   Next
|
   Identity dialogue
      Required information
         Full name: firstname surname
         Email address: remote-user-name@example.net
      Next
|
Receiving Email dialogue Server Type: POP Configuration Host: mail.example.net Username: remote-user-name Authentication Authentication Type: Password Remember this password Next Checking for New Mail Automatically check for new mail every 10 minute(s) Receiving Email dialogue Next |
Enter details of the email server that you send emails to. (This is usually an SMTP server.)
Sending Email dialogue Server Type: SMTP Server Configuration Host: smtp.example.net Next |
Account Management dialogue Account Information Name: Example Next Done Finish |
2.5. Test evolution's configuration
Use either the File menu or New Message button to open the Compose a 'message' dialogue.
Menu bar
   File
      New
         Mail Message
|
Button bar
   New Message
|
Compose a message dialogue
   To: remote-user-name@example.net
   Subject: Evolution test 1
Send
|
Button bar
   Send / Receive
|
Move on to the next section when you are sure that the system is working correctly.